January 20, 2008

Investigating File Deletion from Windows File Servers - Part III

This article is the continuation of parts I and II and it concludes this "Investigating File Deletion from Windows File Servers" series.

In Part I I provided a network capture file in pcap format (file_deletion_full_trace.cap) and asked a few questions about the deletion of some files from a Windows file server:

Q1 - How many files were deleted?
Q2 - When?
Q3 - How?
Q4 - Who did it?
Q5 - From where?


In Part II I answered questions Q1 and Q2. In this final article of the series I'll answer the remaining questions: Q3 to Q5.

Q3 - How?

From our previous investigation to answer Q1 we know that the files were deleted using the SMB protocol. OK, but what tool and/or procedure did the attacker use? Here we can only guess, since there are several SMB client applications out there and the attacker could have created and used his own. But we can try and do an educated guess.

By far the more widely spread SMB client applications is Windows' own "explorer.exe" (Windows Explorer), so we could ask ourselves: Is it possible that the attacker used plain old Windows Explorer and deleted the files by selecting them and pressing the "Del" key on the keyboard (or right-click>delete)? The best way to test this hypothesis would be to set up a test lab, follow the procedure just described while capturing the network traffic and then compare the network trace with the capture file being studied. If you do that you will see that the network traces, in terms of SMB messages, are almost identical. That would allow us to conclude that most probably that was the tool and procedure used by the attacker to delete the files: Windows Explorer, select a file, right-click > delete.

In fact, that's exactly how these particular files were deleted. I know because I did it :-).

Q4 - Who did it?

We know the files were deleted through an SMB session (potentially, each file from a different SMB session) from IP address 10.10.10.11. So we could be tempted to answer right away Q4 and Q5 saying that the files were deleted by whoever was sitting at 10.10.10.11 at that point in time. But we can do better.

When an SMB session is established the user accessing the server needs to prove his or her identity unless anonymous access is being used. In order to see who (which Windows user) was the owner of the session that deleted the files we need to find the corresponding session establishment and look at the authentication tokens.

Note: From now on (Q4 and Q5) I will be concentrating on the deletion of the first file only (\\SERVER1\PROJECT1\file4.txt, FID 0x8004). The same procedure could be applied to the other file (\\SERVER1\C$\Shared Folders\Project1\file8.txt, FID 0x8001) to obtain the corresponding answers for Q4 and Q5. I'll give the answers for that second file too, but I won't be showing the procedure again. Instead, I'll leave that as an exercise for the reader.

Let's start by selecting the packet where file ID 0x8004 was marked for deletion and let's check the SMB User ID in it:
C:\>tshark -nn -r file_deletion_full_trace.cap \
-R "smb.disposition.delete_on_close==1 and smb.fid==0x8004"

1707 903.726800 10.10.10.11 -> 10.10.10.3
SMB Trans2 Request, SET_FILE_INFO, FID: 0x8004

C:\>tshark -nn -r file_deletion_full_trace.cap \
-R "frame.number==1707" -V find "User ID:"

User ID: 2049


The User ID (2049) is assigned by the server at session establishment (SMB Session Setup AndX Request/Response, smb.cmd=0x73) so let's look for those packets before frame 1707:

C:\>tshark -nn -r file_deletion_full_trace.cap \
-R "frame.number==1707 or \
(frame.number<=1707 and smb.uid==2049 and smb.cmd==0x73)"
598 10.10.10.3 -> 10.10.10.11 SMB Session Setup AndX Response
828 10.10.10.3 -> 10.10.10.11 SMB Session Setup AndX Response
1527 10.10.10.3 -> 10.10.10.11 SMB Session Setup AndX Response
1707 10.10.10.11 -> 10.10.10.3 SMB Trans2 Request,
SET_FILE_INFO, FID: 0x8004


We see that the last time that UID is assigned before frame 1707 is on frame 1527, SMB Session Setup AndX Response. Let's find its corresponding request:
C:\>tshark -nn -r file_deletion_full_trace.cap \
-R "frame.number==1527" -V find "Response to:"
[Response to: 1525]


We see that the request was in frame 1525. Let's check out the authentication part inside that frame:
C:\>tshark -nn -r file_deletion_full_trace.cap \
-R "frame.number==1525" -V more
[...]
Ticket
Tkt-vno: 5
Realm: SANS.ORG
Server Name (Service and Instance): cifs/server1.sans.org
Name-type: Service and Instance (2)
Name: cifs
Name: server1.sans.org
enc-part rc4-hmac
Encryption type: rc4-hmac (23)
Kvno: 5
enc-part: C26F4754CD8AEC79F9A8C095147CC075F6038D85074CC0E3...
[...]


The request contains a Kerberos service ticket for service CIFS (SMB) at server "server1.sans.org". This doesn't identify the user yet, but we are getting closer. What we need to do now is see if we can find the request for this ticket to the Ticket Granting Service (TGS) that must have ocurred before, because that request must have contained the Ticket Granting Ticket (TGT) obtained by the user at logon.

Let us find all previous appearances of this service ticket by looking for the encrypted part (enc-part). Using the GUI (Wireshark) we can easily build a filter that will match the whole "enc-part" contents, but to avoid typing too much in the TUI (Text-based User Interface, Tshark) we'll just look for the first four bytes and hope there is no collision:
C:\>tshark -nn -r file_deletion_full_trace.cap \
-R "kerberos.ticket.data[0:4]==C2:6F:47:54"
824 10.10.10.3 -> 10.10.10.11 KRB5 TGS-REP
826 10.10.10.11 -> 10.10.10.3 SMB Session Setup AndX Request
1525 10.10.10.11 -> 10.10.10.3 SMB Session Setup AndX Request
2813 10.10.10.11 -> 10.10.10.3 SMB Session Setup AndX Request


We see that the service ticket used in 3 different SMB session establishments and before that, on frame 824, we see the ticket in a response from the Ticket Granting Service. That's the frame we are interested on right now. Let us see its contents:
C:\>tshark -nn -r file_deletion_full_trace.cap \
-R "frame.number==824" -V more
[...]
Source: 10.10.10.3 (10.10.10.3)
Destination: 10.10.10.11 (10.10.10.11)
[...]
User Datagram Protocol, Src Port: 88 (88), Dst Port: 1076 (1076)
[...]
Kerberos TGS-REP
Pvno: 5
MSG Type: TGS-REP (13)
Client Realm: SANS.ORG
Client Name (Principal): david
Name-type: Principal (1)
Name: david
Ticket
Tkt-vno: 5
Realm: SANS.ORG
Server Name (Service and Instance): cifs/server1.sans.org
Name-type: Service and Instance (2)
Name: cifs
Name: server1.sans.org
enc-part rc4-hmac
Encryption type: rc4-hmac (23)
Kvno: 5
enc-part: C26F4754CD8AEC79F9A8C095147CC075F6038D85074CC0E3...
[...]


We see that the response indicates that the ticket was issued to client principal (user name) "david" of realm "SANS.ORG". That is, user "david" belonging to the Windows domain "sans.org" (david@sans.org).

That answers Q4 for file4.txt: it was "david@sans.org" or someone using his authentication credentials who deleted the file. If you apply the same procedure for file8.txt you will discover that it was deleted using a different identity, namely "user1@sans.org".

Q5 - From where?

We already know the deletions were performed from IP address 10.10.10.11, but can we identify the box that had that IP address at that time, like knowing its computer name or netbios name? The answer is yes, we can.

First, let us find the kerberos request to the TGS corresponding to the response we just saw (frame 824, see above):
C:\>tshark -nn -r file_deletion_full_trace.cap \
-R "udp.port==88 and udp.port==1076"
823 568.900098 10.10.10.11 -> 10.10.10.3 KRB5 TGS-REQ
824 568.901698 10.10.10.3 -> 10.10.10.11 KRB5 TGS-REP


That request must contain a Ticket Granting Ticket (TGT) of the user:
C:\>tshark -nn -r file_deletion_full_trace.cap \
-R "frame.number==823" -V more
[...]
Ticket
Tkt-vno: 5
Realm: SANS.ORG
Server Name (Service and Instance): krbtgt/SANS.ORG
Name-type: Service and Instance (2)
Name: krbtgt
Name: SANS.ORG
enc-part rc4-hmac
Encryption type: rc4-hmac (23)
Kvno: 2
enc-part: 92EF34EF9024B61AAD506AECE425F632D5958EED812718CD...
[...]


That TGT must have been obtained from the Authentication Service (AS) at some point:
C:\>tshark -nn -r file_deletion_full_trace.cap \
-R "kerberos.ticket.data[0:4]==92:EF:34:EF"
773 10.10.10.3 -> 10.10.10.11 KRB5 AS-REP
774 10.10.10.11 -> 10.10.10.3 KRB5 TGS-REQ
776 10.10.10.11 -> 10.10.10.3 KRB5 TGS-REQ
796 10.10.10.11 -> 10.10.10.3 KRB5 TGS-REQ
823 10.10.10.11 -> 10.10.10.3 KRB5 TGS-REQ


We see it was obtained on frame 773. Let us find the corresponding request:
C:\>tshark -nn -r file_deletion_full_trace.cap -R "frame.number==773" -V more
[...]
Source: 10.10.10.3 (10.10.10.3)
Destination: 10.10.10.11 (10.10.10.11)
User Datagram Protocol, Src Port: 88 (88), Dst Port: 1069 (1069)
[...]
C:\>

C:\>tshark -nn -r file_deletion_full_trace.cap \
-R "udp.port==88 and udp.port==1069"
772 10.10.10.11 -> 10.10.10.3 KRB5 AS-REQ
773 10.10.10.3 -> 10.10.10.11 KRB5 AS-REP


We see that frame 772 containes the kerberos request for the TGT. Let us see what this request contains:
C:\>tshark -nn -r file_deletion_full_trace.cap \
-R "frame.number==772" -V more
[...]
Source: 10.10.10.11 (10.10.10.11)
Destination: 10.10.10.3 (10.10.10.3)
User Datagram Protocol, Src Port: 1069 (1069), Dst Port: 88 (88)
[...]
Client Name (Enterprise Name): david@sans.org
Name-type: Enterprise Name (10)
Name: david@sans.org
Realm: SANS.ORG
[...]
HostAddress CLIENTXP1<20>
Addr-type: NETBIOS (20)
NetBIOS Name: CLIENTXP1<20> (Server service)


Finally, we see that the request for a TGT contains not only the principal name (david@sans.org), which we already knew, but also the NetBIOS name of the computer from which the request was sent: "CLIENTXP1".

This answers our last question, Q5, for file file4.txt: the file was deleted from the computer CLIENTXP1, which happened to have IP address 10.10.10.11 at that time.

If you care to follow the same procedure for file8.txt you will be able to verify that the hostname from which user1@sans.org authenticated was the same, "CLIENTXP1". Actually, what I did to delete the second file was this: while still logged in as david@sans.org onto clientxp1 I used the "Connect using a different user name" option in Windows Explorer to map the second shared folder and provided the authentication credentials (username and password) of user1@sans.org. Then I proceeded like the first time: I selected the file and pressed Delete.

A final note: I have used the domain name "sans.org" all across the article and you will also find it in the network trace. This doesn't mean than any systems belonging to The SANS Institute (http://www.sans.org/) were actually involved in the test lab I set up nor in the real incidents I based this analysis on. It just happens to be the case that the machines I used in the test lab were two of the virtual machines I use when I teach SECURITY 505: Securing Windows.

All the best,
David

Labels: ,

January 15, 2008

HoneySpot: The Wireless Honeypot

As a member of the Spanish Honeynet Project, we have released today a new paper called "HoneySpot: The Wireless Honeypot. Monitoring the Attacker’s Activities in Wireless Networks. A design and architectural overview".


It seems that wireless technologies drive our world, a world without cables where information is available from anywhere at anytime. Since its origins in 1999, when the Honeynet Project was founded, honeypot and honeynet solutions have been extensively used to monitor the attacker’s activities in different IT environments. Surprisingly, honeypot solutions have not been widely applied to wireless technologies. This implies that there is a significant lack of knowledge about the current state-of-the-art of wireless attacks effectively used to break into wireless networks.

Trying to fill this knowledge gap, the main goal of this research is to analyze the state of real life wireless hacking, and introduce and promote the design and deployment of wireless honeypots. In this paper (or mirror) we will first provide an overview of wireless honeypots along history, to further analyze the wireless honeypots objectives and its taxonomy. The paper then mainly focuses on the details of the design and architecture of an 802.11 wireless honeypot, providing an extensive overview of its different components and their requirements. Some guidance is provided from a deployment and implementation perspective, and finally, how this solution can be further enhanced, and extended to other wireless environments, is detailed.

The paper tries to create awareness and help to guide the deployment of wireless honeypots, or HoneySpots (a term I originally coined ;)), mainly focused on 802.11 (WiFi), although future research will cover other wireless technologies, such as Bluetooth or WiMAX. We’re currently involved in deploying these technologies, capture attacks and related information, develop analysis tools, and will publish a future paper with the findings. Meanwhile, we would like to publicly promote the deployment of these technologies by releasing this paper.

On a related note, every time I teach the SANS "Assessing and Securing Wireless Networks" course (BTW, the next European session is in Prague on February 18-23, 2008), some student that is evaluating enhancements on his environment, or designing and planning a new wireless environment, asks me about the best (or my preferred) wireless vendor(s). Although I always try to be vendor agnostic, I try to help pointing out the good and bad of each vendor based on my experience. Recently, two very interesting and informative reports have been released, the second one specifically focused on VoIP over WiFi:

Enjoy the details of these two reports and the "HoneySpot: The Wireless Honeypot" whitepaper!!

Labels:

January 05, 2008

Guide to activate & jailbreak the iPhone 1.1.2 OTB on Windows - Upgrade & Re-Activate (4/4)

The last step, STEP 4, is focused on upgrading the iPhone to version 1.1.2, and re-activating and jailbreaking the device again on the new version.

Once the iPhone restarts from the 1.1.1 jailbreak on the previous step, STEP 3, by default it will reconnect to the previously selected wireless network if it is still available. This connection is required to access the software repositories and install new tools.

1- Click on the "Installer" icon on the iPhone (the last blue icon on the main iPhone screen, aka the Springboard). The "Welcome Installer 3" screen will show up.

2- iTunes is required to upgrade the iPhone, so the iPhone must be still connected to the USB port. During the whole process iTunes can be running on your computer. At this point, iTunes will detect a new activated iPhone and will ask you for the device name, sync information, etc. Select a name for the iPhone and uncheck the auto synchronization checkbox. Click on "Exit".

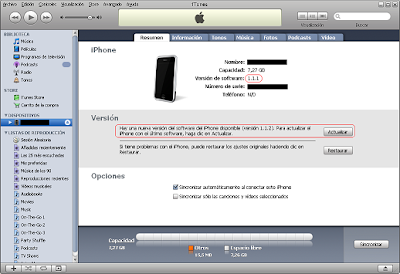
3- Select the name of the iPhone in the left column of iTunes. iTunes will show the default screen, including the "Check for Update" and "Restore" buttons.

4- On the iPhone select the "Installer" icon. The AppSnapp tool will connect to the Internet and access and refresh the current software source repositories.

NOTE: If you access the "Installer" and it asks you to update itself, please, do so. The current version at the time of this writing is 3.0b8.

5- Select the Install icon ([+] symbol) and go to the "Tweaks (1.1.1)" category. Select "OktoPrep" and click the "Install" button on the top-right corner of the iPhone.

NOTE: There are current reports (Feb'08), where Oktoprep is not available anymore. See comments below from other readers.

[*] This step installs OktoPrep 1.0, a tool that prepares 1.1.1 iPhones for TouchFree jailbreak. It runs the steps (it modifies files unaltered by the 1.1.2 firmware) required to be able to run the Windows-based TouchFree jailbreaking tool after upgrading the iPhone to version 1.1.2. Therefore, OktoPrep must be installed and run on iPhone 1.1.1, and TouchFree (aka Jailbreak) must be run on Windows after upgrading the iPhone to version 1.1.2.

BTW, in the "Tweaks (1.1.1)" packages section you can also find the tool that fixes the TIFF vulnerability. Other useful software packages are available here. [*]

6- Once OktoPrep is installed, it will show a message on the iPhone saying "You are now ready to perform an "Update" to 1.1.2 and continue with the TouchFree process". Press the OK button.

7- Press the Home button on the iPhone to exit the Installer and go back to the main iPhone screen ("slide to unlock").

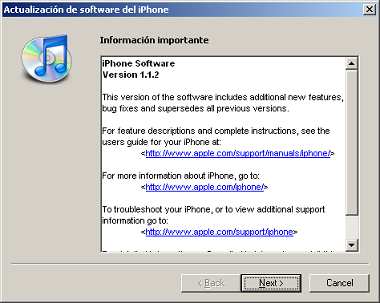
8- At this point, go to iTunes and select "Check for Update". iTunes will find, download and install a new update, and will upgrade the iPhone to firmware version 1.1.2. This time you won't get an error message like when you downgraded to 1.1.1 in STEP 2.

-- UPDATE for iPhone 1.1.3 --
Disclaimer: I got the confirmation that this new 1.1.3 section works. Thanks Mateo!.

During January 2008 Apple has released the 1.1.3 version, therefore, you do not have direct access from iTunes to the 1.1.2 firmware but to the latest 1.1.3 version. DO *NOT* UPDATE TO 1.1.3!!

In order to update your iPhone from 1.1.1 to 1.1.2 you need to follow a similar process as the one we used in STEP 2 for the downgrade. First of all, download the iPhone 1.1.2 firmware file. The MD5 value for this file is "8337fa372a6a629d38856f3ed40beeff". Press the Shift key in Windows and then click on the "Check for Update" button in iTunes. The Shift key is required to be able to select a firmware file (if you use the "Recover" button it will undo the actions from the previous step, removing OktoPrep, as it restores the default factory firmware).

A window to browse for files will open. Select the recently downloaded iPhone 1.1.2 firmware file and press the "Open" button. iTunes will upgrade your iPhone to 1.1.2.

NOTE: The files associated to the firmware updates performed through iTunes are stored at "C:\Documents and Settings\USER\Application Data\Apple Computer\iTunes\iPhone Software Updates".
-- UPDATE for iPhone 1.1.3 --


The update process will take a few minutes (15-20 minutes depending on your Internet connection), as iTunes needs to download the 1.1.2 firmware version. During the process the iPhone will reboot a couple of times. After the new 1.1.2 version is downloaded and installed by iTunes inside the iPhone, the iPhone will show the new picture on the default iPhone screen (see STEP 1). iTunes will show again the default AT&T activation screen.

9- Close iTunes and unzip the previously downloaded (STEP 1) Jailbreak 1.1.2 tool, 1.1.2-jailbreak.zip. Inside the tool folder you will find a file called "windows.bat".

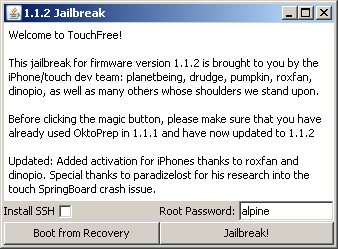
10- Run "windows.bat", that is, the TouchFree or Jailbreak Windows tool to jailbreak the iPhone 1.1.2 version. You are presented with the welcome screen.


Jailbreak is a Java based tool. Who said that Java could not be used for real-world hacking?... that only C or C++ can ;)


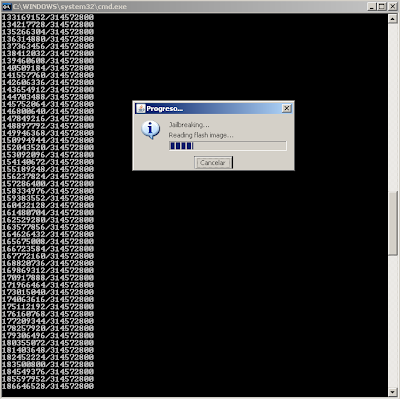
11- I suggest you to select the "Install SSH"checkbox, so that you can get access to the iPhone through SSH for future advanced tasks. Please, change the tool default root password by selecting a customized, long and robust root password. Click the "Jailbreak!" button and the jailbreak process for the iPhone 1.1.2 will start.


The "alpine" password suggested by the tool is the one associated by default to the root iPhone user in 1.1.1 and 1.1.2 (not in 1.0.2). The default "mobile" user password is "dottie". The jailbreak process takes around 2-5 minutes and at the end, the iPhone reboots and you will get the following message:


After that, the device reboots a couple of times, please be patient, and finally you will get the default iPhone screen with the "slide to unlock" page. At this point, you can click OK on the last jailbreak message. iTunes detects the iPhone, starts, and shows the new updated version, 1.1.2.


At this point, you have an almost fully functional 1.1.2 iPhone. It is activated, you can install third-party applications, and the next step should be to unlock the device through a TurboSIM or similar hardware SIM to use the phone capabilities.

Esteban is very happy now, as the initial iBrick he got from the store is now an interesting still-to-explore iPhone device, and hopefully, a cell phone soon :) If you are as happy as Esteban, please donate some cash to the projects involved in the development of all the tools used throughout this guide!

Future posts will focus on specific iPhone security aspects!

Labels:

Guide to activate & jailbreak the iPhone 1.1.2 OTB on Windows - Jailbreak & Activate (3/4)

In STEP 3 the goal is to jailbreak the iPhone, that is, take control of the device in order to be able to activate it and run third-party applications. We are going to use Safari on an unactivated iPhone, and browse to a specific Web site that is going to exploit a vulnerability in the device and execute the code required to "free" the device.

Prerequisites:
  • Wireless (802.11b/g) Internet connectivity is required for the iPhone in order to activate and perform an initial jailbreak on the device.
  • iTunes is not required in this step. You can leave the iPhone plugged in to the USB port and iTunes running.
  • The default AT&T SIM card provided with the iPhone must be inserted in the phone.
1- Go to the iPhone activation screen that shows "slide for emergency" at the bottom and slide to get the "Emergency Call" window plus the phone keypad. Dial *#307# and press the "Call" button.

2- The iPhone will start ringing. While it rings, erase *#307# by using the back button on the top of your iPhone screen. Type 0 and press the "Call" button. The iPhone will start ringing again. This time you must press "Answer" (green button) and then press the "Hold" button. The iPhone will start ringing again. This last time press "Decline" (red button). You now get access to the menu showing options for the favorites, contacts, etc.

You need to perform the next step "quickly", not to get locked out of the screen, as the default iPhone lockout timeout is one minute. If you are idle more than one minute and get locked out, follow this quick sequence of steps:
  • Thereafter, every time you want to get to the same screen, you need to push the iPhone Home button, just slide the "slide for emergency" button, then press 0, press Call, press Answer, press Hold, and press Decline.
3- From the keypad screen, select "Contacts" and add a new contact through the [+] symbol:
  • Then select "First Last", add "Testing" as the contact name, and select Save.
  • Select "Add URL", type "prefs://1F", and select Save.
  • Select "Add URL" again, type "http://jailbreakme.com", and select Save.
When this is done, select "Save" again to store the new contact and the iPhone will take you to the contact "Info" page, displaying the name "Testing" and the two URLs you just added.

4- Select the "prefs://1F" URL and it will open the iPhone "Settings" page. Select "General" and the "Auto-Lock" option. Set the value to "Never", so that the iPhone screen doesn't get locked for the next steps if you are more than one minute reading this guide :)

5- Go back to the "Settings" screen. From there, select "WiFi" and add or choose your wireless network and make sure you are connected to it (you shouldn't get an error connection message).

6- Now, hit the Home button on the iPhone to go back to the activation screen, slide and dial the number 0. The iPhone will now ring again, press Answer, press Hold, and press Decline; just like before.

7- Now, select "Contacts" again and then the "Testing" contact added previously, this time go to the "jailbreakme.com" URL (second one). At the time of the testing, the domain is associated to IP addresses 91.121.18.102 and 208.75.87.234. Safari will open and load the page. When the page loads, scroll down and click on "Install AppSnapp".

Safari will now close and the iPhone returns back to the activation screen. It takes about one minute for the application to get installed. Be patient. At this point, the iPhone will restart. Once you get to the activation screen again, slide to access the dial keypad. When you do this, the iPhone will restart again. Once the iPhone comes back, you can slide to get access to all the iPhone functions/icons for the first time. At this point you are activated and jailbroken!

[*] Remember that in STEP 2 we downgraded the iPhone to version 1.1.1. The "jailbreakme.com" Web site takes advantage of a vulnerability in the version of the libtiff library contained on iPhone version 1.1.1 through the MobileSafari browser. Exploiting this vulnerability it is capable of running code inside the device (see CVE-2006-3459 and the original exploit, plus source code).

The exploit inside the "/files/y.tiff" file at "jailbreakme.com" opens the iPhone for full disk access and installs the AppSnapp Installer for iPhone 1.1.1, called Installer.app, by Nullriver Software. At the time of this writing it installs version 3.0b4. In fact, the TIFF file opens the door for other files (from "/files") that are downloaded to the iPhone to perform the hack, such as "payload2.bin", "root.zip", or "youtube.zip". You can even build your own "jailbreakme" server (forums). [*]

The AppSnapp Installer is a software package management tool that allows you to add/install any third-party application into the iPhone. It includes an "Installer" icon on the main iPhone screen for easy access to the software community repositories. Additionally, during the hack process the TIFF image-rendering library vulnerability is fixed (you're now more secure :) ), and YouTube is fixed too.

BTW, this jailbreaking process also works on the iPod Touch. When writing this portion of the guide I found a video covering exactly this step. The specific set of actions is slightly different but gives you an idea of how it should look like.

Some of the alleged reasons argued by Apple not to allow third-party applications are the potential loss of quality and instability on the device, as well as the security risk of getting malware. I agree that "untrusted" and external code can cause this issues, but users demand flexibility at the cost of it. Anyway, this is changing with the currently available WebApps and resources for developers, plus the upcoming native application development kits (Feb'08?).

At this point, you have jailbroken and activated the iPhone, version 1.1.1, and you are ready to jump to the last step, STEP 4, in order to upgrade to version 1.1.2 and re-activate the iPhone.

Labels:

Guide to activate & jailbreak the iPhone 1.1.2 OTB on Windows - Downgrade (2/4)

This next step (STEP 2) requires to downgrade the iPhone from version 1.1.2 to 1.1.1. Why we need to follow this process? Because in STEP 3, we will take advantage of a vulnerability in the 1.1.1 version of the iPhone and run code inside the device.

From now onward, I'll start adding some security-related comments for the infosec readers
, marked with [*].

NOTE: Internet connectivity is required on the computer running iTunes in order to start the activation process.

1- Connect your iPhone via USB to your computer. iTunes starts, connects to the Internet, and displays the default activation screen (the one this guide tries to bypass).

All iTunes screenshots are based on the Spanish version, the one used by Esteban

[*] During the activation process, iTunes resolves "phobos.apple.com" and establishes an HTTP session (asking for "/bag.xml?ix=2"). It is redirected to "http://ax.phobos.apple.com.edgesuite.net", and asks for "WebObjects/MZStore.woa/wa/initiateSession?ix=2" and multiple related resources. It is amazing to see the amount of Apple proprietary HTTP headers used in the exchanges. BTW, the iTunes 7.5 HTTP User-Agent on Windows is:
User-Agent: iTunes/7.5 (Windows; U; Microsoft Windows XP Professional Service Pack 2 (Build 2600)) DPI/96

Finally, iTunes resolves and establishes an HTTPS connection against "albert.apple.com", the real activation server; it also uses HTTP against the same server to retrieve multiple images. [*]

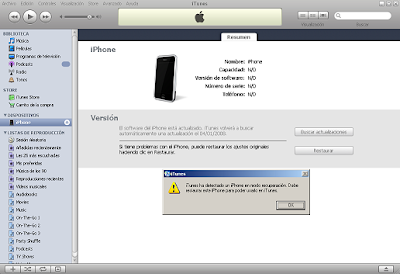
2- Click the Home button (the main and only button on the screen) and the Sleep/Wake button (on the top right corner of the device) on the iPhone simultaneously and keep pressing them until iTunes detects (and shows a message to indicate) that the iPhone is in recovery mode. You need to press both buttons around 10-30 seconds.


The iPhone restarts during the process, it gets disconnected from Windows (you can hear the typical Windows USB disconnect device sound) and is reconnected back again.

3- Dismiss the warning message in iTunes by pressing the "OK" button. You are presented with two options: "Check for Update" and "Restore". Press the Shift key in Windows and then click on the "Recover" button in iTunes. The Shift key is required because if it is not used, then the restore operation will restore the iPhone to the default factory setting and the latest firmware version (1.1.2), instead of allowing you to select a new firmware file.

A window to browse for files will open. Select the iPhone 1.1.1 firmware file you should have downloaded on STEP 1 and press the "Open" button. iTunes will downgrade your iPhone, a process that takes around 5 minutes. The downgrade process will end up with a 1013 or 1015 error message (see image).


4- Press the "OK" button to confirm the error message. You are returned back to the restore warning message. Press the "OK" button to confirm this message too.

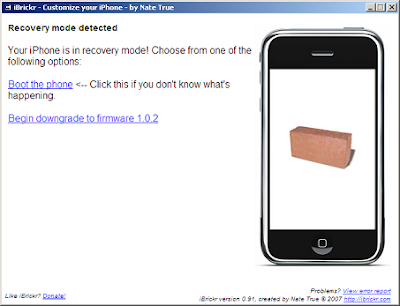
5- In order to get out of the "after the downgrade/restore" state, you need the iBrickr tool for Windows you downloaded on STEP 1. Uncompress the ZIP file and run the tool (ibrickr.exe).

6- Chose the "Boot the phone" option to reboot the iPhone and get out of the recovery mode.


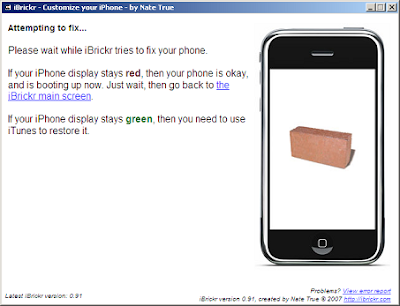
During the process the iPhone background turns red, that's the good color here :), as explained in the iBrick "Attempting to fix..." window.


Once the iPhone has restarted, it will run iPhone firmware version 1.1.1 and you will get the old "Activate iPhone" screen on the iPhone, that is, a globe image. iTunes will show the AT&T activation screen again, and you can close the iBrickr tool.

At this point, you have downgraded the iPhone from version 1.1.2 to 1.1.1, and you are ready to jump to STEP 3 in order to jailbreak the device.

Labels:

January 02, 2008

Guide to activate & jailbreak the iPhone 1.1.2 OTB on Windows - Prerequisites (1/4)

The initial preparation step (STEP 1) in order to get a free and usable iPhone 1.1.2 OTB (Out of The Box) requires to obtain all the software needed to activate and jailbreak the iPhone. This guide is based on the following components and versions:
  • Computer OS: Windows XP SP2
  • iTunes v7.5.0.20
  • iPhone firmware version 1.1.2 OTB - Serial number: XXX47... (bootloader v4.6)
  • iPhone modem firmware version: 04.02.13_G (aka baseband)
The iPhone firmware version can be easily determined by looking at the default, unactivated, iPhone screen. If it shows a globe (left image), it is version 1.1.1 or lower; if it shows a music CD and cable (right image), it is version 1.1.2.

Images obtained from www.hackthatphone.com.

How to check the iPhone modem firmware version:
1- Turn on your iPhone.
2- The default screen shows the "slide for emergency" button at the bottom.
3- Slide and you will get the "Emergency Call" screen plus the phone keypad.
4- Type the *3001#12345#* number and press the "Call" button.
5- You will get the "Field Test" window.
6- Select the "Versions" menu option.
7- You will get information about your firmware (find the typo :)), such as:
Firware version: 04.02.13_G
LCD Panel ID: ...
This output corresponds to version 1.1.2. The previous iPhone version, 1.1.1, shows 04.01.13_G (01 instead of 02) as the modem firmware version. A complete list of iPhone versions and the corresponding modem firmware versions is available here.

Once the details of the required elements have been verified, you need to download three files:
After downloading these files, verify their integrity using any MD5 tool, like md5deep:
C:\>md5deep iPhone1,1_1.1.1_3A109a_Restore.ipsw
d6508e86d588a76547b9cae52d38e325 C:\iPhone1,1_1.1.1_3A109a_Restore.ipsw
C:\>md5deep ibrickr_v0.91.zip
cff8165f71f74af3f5ad75250fd21d31 C:\ibrickr_v0.91.zip
C:\>md5deep 1.1.2-jailbreak.zip
eaef139f3a14ee9aabc7dc445741ca31 C:\1.1.2-jailbreak.zip
At this point, you are ready to jump to STEP 2 and downgrade the iPhone's firmware version from 1.1.2 to 1.1.1.

Labels:

Activating/Jailbreaking/Unlocking the iPhone 1.1.2 OTB - State-of-the-Art

Disclaimer: Use of any information available on this and future related posts is at your own risk, you are 100% responsible for what you do or don't do with it, including any Apple's copyright violation or infringement. For an applicable detailed disclaimer about iPhone hacking, please check this! All the information published in this series of posts has been provided by my friend Esteban J., also known as Steve J.

This series of posts is about how to activate the iPhone version 1.1.2 OTB (Out of The Box) without requiring a 2-year AT&T service agreement. It also provides an update of the current iPhone hacking scene on January 1st, 2008, plus a detailed step-by-step guide to complete the iPhone activation and jailbreak process.

My friend Esteban got an iPhone recently, and because he lives outside the US, he cannot (or don't want to) use the associated AT&T service and rate plans. By default, if you do not activate an AT&T account, the iPhone is just a brick, or iBrick :) The first step required after unpacking the device is to connect it to your laptop, and follow the Apple/AT&T iPhone activation process using iTunes. If you do not provide your contact details (including credit card info), and get (or migrate to) an AT&T contract, you cannot activate the iPhone and access any of its functionality.

The iPhone is a pretty impressive small device running OS X. Basically, it's like an iPod Touch (iPod + WiFi) with GSM/EDGE + Bluetooth 2.0 capabilities, plus a 2.0 megapixels camera; an all-in-one device, where the main drawbacks are the lack of a built-in GPS and 3G support (a very common technology in mobile networks all over Europe). Apart from the technical specs, the main differentiator is the user interface (the "Touch":) ).

This and future related posts try to provide a simplified guide to hack the last version of the iPhone, and try to summarize and clarify the huge amount of information available out there related with the topic, specially given the differences between the various iPhone versions, mainly 1.0.2, 1.1.1 & 1.1.2. It's not cutting-edge information, as there are tons of iPhone hacking resources, such as the Hackint0sh Forums, iPhone unlock, hackthatphone, iphone-hacks, modmyifone or winandmac.com. It just pretends to be an easy to follow guide, informative update, all seasoned with some home-made technical security research. What makes iPhone hacking pretty interesting, is that the main hack is just based on executing code inside the device after exploiting a well-known vulnerability in one of its components, the Safari web browser.

My friend's end goal is to be able to activate a US iPhone in Europe, including all its capabilities. At the end of December, this is the iPhone hacking state-of-the-art:
  • The current and latest iPhone version (factory, or OTB) is 1.1.2.
  • The associated modem firmware version is 04.02.13_G.
  • If the device serial number starts with XX745... or above, it means it has been released on week 45 or above, and the bootloader version is 4.6.
This device (commonly referred as 1.1.2 OTB) is the one currently available on stores and presents strong hacking limitations at this point in time. The end-result of this guide will be an unlocked or free iPhone, without phone capabilities, that is, something like an iPod Touch, plus Bluetooth and camera. The reason is that the current bootloader has not been hacked through software yet (although several smart people are actively working on it). The previous bootloader version, 3.9, was hacked and allows you to take advantage of the phone capabilities using a SIM from any telecom mobile operator. Unfortunately, the hack doesn't work yet with the 4.6 bootloader.

At this point, the only option to get a fully working 1.1.2 OTB iPhone is to follow this (or a similar) guide, plus getting a hardware-based hacking SIM, such as TurboSIM (around $40). Although there are (or were) multiple iPhone activation methods without an AT&T account, the one presented in this guide (or series of posts) is the easier one and it works with the current iPhone version.

Before starting with the detailed process, let's clarify a few terms:
  • Downgrade is the process that involves going from a major firmware version to a minor version, such as from the current default 1.1.2 version to 1.1.1. Upgrade is just the opposite.
  • Activation is the process required to enable the iPhone, in this guide, bypassing the standard AT&T activation to get access to (almost) all the functions in the iPhone.
  • Jailbreak is the process that provides you the ability to install third party applications on the iPhone.
  • Unlock is typically used to refer to the process required to unlock or free the iPhone's SIM module, so that the iPhone can be used with any SIM card (instead of the AT&T default SIM).
At this point, you are ready to jump to the first step of the step-by-step guide to activate and jailbreak an iPhone's 1.1.2 OTB.

On a personal note, and not being a lawyer, Apple is clearly fighting hard to keep its exclusiveness and prestige, although I think that once you pay for the device in an Apple Store, the device belongs to you, that is, you're the owner... so, you can play with it!

Some Apple iPhone facts:
  • It seems that about a month ago, Apple limited the number of units that can be acquired in the US per person, from 5 to 2.
  • Esteban couldn't pay the iPhone by cash. He needed to use a credit card so that Apple can track the number of units he buys (see previous bullet).
  • Recently (end of 2007) the iPhone has officially reached some European countries, like UK, Germany or France.
  • Esteban didn't sign up any contract when he bought the iPhone, although he religiously paid its price in an Apple Retail Store.
  • Esteban was not notified during the buying process about all the details of the iPhone and AT&T service agreement, and the constraints not only for the phone capabilities, but for the device as a whole.
  • Esteban was allowed to buy the iPhone although he does not live in the US, as his credit card and passport reflected during the payment process.
  • Finally, iPhone version 1.1.3 is going to be released soon, and as usual, it seems it will affect the current activation, jailbreaking and unlocking hacks.
It seems we do not learn from the past! The best offer is that combining a great product and a brilliant commercial strategy. Demanding customers today ask for flexible, open, customizable, and "hackable" products, and if you do not believe me, ask Microsoft or Linksys/Cisco. In my modest opinion, if Apple wants to attract a population other than Apple's staunch admirers, they should reconsider the iPhone go-to-market strategy. On the other hand, if they want to avoid this type of hacks, they could simply not sell the device without an associated service contract, as it is the case in Europe for several cell phones (unless you pay more for the device).
--
¡Happy New Year 2008 to all our readers!

Labels: